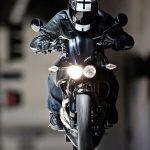
Peon Maface Posted May 6, 2021 Share Posted May 6, 2021 Human beings are predisposed to collect pictures of their exploits. From back in the time of cave dwellers with their wall art to oil painting to the camera obscura to film to today with our digital cameras, we have an innate desire to create physical manifestations of our memories, and while we now carry important photos in phones instead of our wallets, this need to capture moments and try to relive them later seems to be undergoing a heretofore unseen level of growth. Unfortunately, most of these images are quick grabs without much – or any – thought put into the process and how to make the image as visually pleasing as possible. They are just frozen slices of time. But they can be so much more. 155 mm, 1/800@ f/6.3. If you’re one of those people who has spent almost as much time looking at the photos as you have reading the text of motorcycle publications, then maybe you’d like to try your hand at photographing motorcycles, too. You really can start doing it with almost any DSLR you may happen to have. Who knows, you may find a new hobby to go alongside your love of riding motorcycles. After all these years, I have no regrets for transporting cameras for many thousands of miles on my back, in tank bags, or panniers. It was well worth the effort. Finally, before we move on to the photography tips, I would be remiss if I didn’t point out that the act of shooting motorcycles often requires multiple passes back and forth in front of the camera. Remind your riders to do it safely, even if it means riding down the road a quarter mile or more to a pull out. Believe it or not, the most dangerous thing we do as motojournalists is make U-turns on winding two lane roads. Visibility is limited, and often the road is quite narrow, which makes turning around a challenge on big bikes. Be safe out there. (Another option is to hang out in a corner on a popular road and shoot everyone who comes by.) 1. It’s about the technique, not the camera Don’t get me wrong, there’s a reason why professional photographers spend a small fortune on camera gear, and you can run up a bill of more than $10,000 in the blink of an eye. Still, for the motorcycle and camera enthusiast, you don’t have to have the latest and greatest gear or the biggest sensor to capture stunning motorcycle photos. For example, during six of my seven years at MO, I was using an 8.2 megapixel camera. (My iPhone had 50% more megapixels for years.) Many of the photos used in this article were shot with a camera that was 13 years old when I retired it last Fall. My beloved Canon 1D Mark II N, battered and bruised and ready for retirement after 13 years of hard use. The battery even had to be held in with gaffer’s tape for the last six months while I waited for Canon to release the camera I’d chosen to replace it. So, what do you need for motorcycle action photography? If you’re just taking shots of your bike sitting still in beautiful locations, any digital camera will do. Capturing action is what challenges your camera’s capabilities. First, quick autofocus is essential. Being able to move the focus point around the frame will be a plus because it allows you to be creative with your framing. Although I started shooting motorcycles with a camera that could only shoot six frames per second, eight to ten FPS is a pretty common starting point in cameras today. Sensor size is another feature to consider. Both full frame and cropped sensor cameras have their strengths and weaknesses, but for someone starting out in motorsports photography, a 1.6 crop sensor will give you a longer reach with your lenses. They also have the benefit of typically being less expensive than full frame cameras. 420 mm, 1/800 @ f/6.3. Lest you think that you need an expensive camera to shoot motorsports, this photo of Eric Bostrom was shot in 2006 with a Canon 20D and a rented 300 mm lens plus a 1.4x adapter. And now to megapixels. Yes, having more megapixels allows you to crop into your images further. However, as I learned when I jumped from 8.2 mp to the 45 mp of the Canon R5, having more resolution also meant that there was more detail pointing out the flaws in my technique. Then again, when the photos are sharp, they are amazing. Personally, I think anything from 12-20 mp is fine for most uses. In fact, I know of many pro action photographers who are using 20 mp with results that I aspire to. Finally, the question of DSLR or mirrorless. With a DSLR, you are actually looking through the lens, thanks to a mirror that flips out of the way when the photo is captured. Mirrorless cameras have the sensor exposed to light when turned on, and the photographer has an electronic viewfinder for framing while shooting. Viewfinder lag is the biggest issue facing mirrorless cameras, and naturally, the more expensive ones have the least lag. While mirrorless is certainly the future of digital photography, camera manufacturers are making the best DSLRs ever, right now. So, there is nothing wrong with using a DSLR. 70 mm, 1/500 @ f/5.6. This type of photo could be captured with any point-and-shoot camera – even a smartphone (although the image quality might be compromised). That’s the basics, but we could go way off into the weeds discussing mechanical versus electronic shutter (and it’s rolling shutter effect) or the best cameras for shooting in low light or RAW versus jpeg. If you get into motorcycle photography, you’ll eventually go there. Trust me. 2. Use a long lens, mostly In my motorcycle photography kit, I have three zoom lenses: 24-70mm, 70-200mm, and 100-500mm. However, the vast majority of my photos are taken with the 70-200mm, which is just about perfect for standing on the side of the road to capture passing bikes. Being able to step back away from your subject makes it easier to pan with it because you don’t have to rotate your body as far or as fast as the bike passes in front of you. For head-on shots, a longer lens allows you to compress the background, giving it a more graphic look. Also, longer lenses have a shallower depth of field to blur the areas of the frame that are not specifically in focus – something I do quite a bit in beauty shots. Don’t get me wrong, there are plenty of uses for wider focal lengths. While I typically use a wide lens for more scenic, landscape shots featuring a motorcycle parked in a spectacular location, a wide lens can also be used for action. It’s just significantly harder to capture. When the bike is featured large in the frame, you have to be very close to it, and when it is small in the frame, the slightest miscue with your pan can diminish the bike’s sharpness considerably. Also, it’s fun to be able to distort how things appear in a wide lens by putting the subject extremely close to the lens and letting it’s tendency to accentuate distances play out. 150 mm, 1/1000 @ f/5.0. There is just enough blur to the front tire to give the sense of motion. The way the double yellow frames the rider adds to the sense of speed. Using a super-telephoto lens also brings its own set of challenges, the biggest of which is that, at the long end of the zoom range, tracking the subject can be a challenge. That’s why if you watch professional photographers at the race track, you’ll see them supporting their big glass on a monopod. For my purposes, I tend to use the 200-300mm the most with my longest lens, saving the really long millimeters for special circumstances. I lean heavily on technological aids, like monopods and image stabilization, when shooting with longer lenses. The ability to minimize errant movement of the lens can’t be downplayed, particularly in pan shots. 70 mm, 1/800 @ f/4.5. This is as wide as my favorite lens gets, but it’s still long enough to have the bike large in the frame, keep me a safe distance from the bike, and still give some locational context. 3. Freeze the action Although we call it still photography, that is really a misnomer. As photographers, we are really dealing with differing slices of time in our exposures. The higher the shutter speed, the smaller the slice of time represented within the image and, hence, the greater the appearance of stillness. The manipulation of the appearance is where photographic skill comes into play. With enough light, you could shoot everything at 1/2000 of a second and get consistently sharp images of motorcycles. Unfortunately, they’d be pretty boring. Everything would look like it is standing still, and the biggest attraction of motorcycling, it’s dynamism, would be left out. So, the trick – and the fun – of shooting bikes is the management of the stillness and movement within the frame. 30 mm, 1/800 @ f/3/2. Freezing the image at peak action is the goal for this photo. Still, there’s just enough blur in the tires to give a feeling of movement. When shooting head-on or front three-quarter shots (or rear shots, too), you want the bike to be as crisp as possible. However, use too high a shutter speed, and you’ll completely freeze the tire tread or brake discs, destroying the sense of motion. Use too slow a shutter speed, and the photo may appear just the slightest bit soft. This is where the creative dance with the subject matter takes place. For street action, I typically shoot these shots from 1/800 sec to 1/1200 sec, depending on the closing speed. 4. Blur the action Pan shots are a different challenge. Here, you’re trying to keep the motorcycle sharp but have the background and the moving parts of the bike blurred. To do this, you lower the shutter speed. However, since you’re shooting a larger slice of time in which the subject is (presumably) moving across the frame, you have to pan the camera to keep the bike in the exact same place in the frame, a simple idea, but it is maddeningly complex in practice. Pan shots are where the photographers who have surgeon-like steadiness in their hands can excel and mere mortals (and people like me who have very shaky hands) can only dream. Still, if I can shoot pan shots, even with my essential tremor, you can, too. It just takes practice. 363 mm, 1/400 @ f/7.1. Although she is riding here, I inadvertently used too fast a shutter speed, making the bike look like it is standing completely still. On the street (track shooting usually requires higher shutter speeds), start at around 1/320 sec, acquire focus early, pan with the subject, and actuate the shutter just before the rider reaches the point where you want to take the shots. In the beginning, you’re going to shoot way more shots than you need, and most will have a focus or motion-blur issue. Initially, your hit/miss ratio will be disheartening. Don’t worry, you’ll get there. Gradually, you’ll want to start lowering your shutter speed to bring progressively more blur into your shots. Note: Your rider doesn’t need to be traveling particularly fast to make it look like they’re flying. You do it with a slow shutter speed, which photographers call dragging the shutter. 168 mm, 1/160 @ f/11. Although the low shutter speed adds to the sense of motion, making the wheels’ spokes disappear, having a wall close behind the rider makes the motion even more apparent. Here’s a trick to make action shots easier: enable back button focusing, which means you separate the focus function from the shutter release. You’ll find this in the custom settings on your camera, and it allows you to use your thumb on one of the buttons on the rear of the camera to begin autofocus, freeing your index finger to only actuate the shutter. This will initially mess with your head, but it’s much easier to use two fingers rather than trying to hold the shutter release down halfway while you pan. 5. Highlight your subject You want to find ways to make your subject stand out from the background. Think about it. That’s what you’re doing with the blur in pan shots. While whole books have been written on this topic, some basic tricks can be used to bring the viewer’s eye to your subject. The first is the depth of field, or how much of your photo is in focus. With a wide aperture (how far the iris in your lens is open), the area in the frame that is in focus gets smaller. The focal length of the lens also plays a role, which is why I frequently use 200 mm and f/2.8 as my settings for beauty shots of a motorcycle’s profile, making it tack sharp and everything else soft. (Remember, the smaller the number of the f-stop, the larger the aperture opening in the lens.) 300 mm, 1/800 @ f/5.0. Even with the rider wearing black, the front-lit subject stands out from the darker background. Focus isn’t the only way to make the photo’s subject stand out. Having the brightly lit bike and rider in front of a dark background or silhouetting them against the sky are just two ways to use light to your advantage. One of my favorite ways to draw attention to the motorcycle is to use graphic elements within the frame. A curving double-yellow line or the shape of objects on the background can frame the motorcycle within the image’s borders, making the subject stand out. 90 mm, 1/100 @ f/4.0. This shot was staged specifically because of how the shape of the tree matched the Victory Magnum X-1. 6. Consider the background This point is really just an extension of the previous one. Nobody wants to see a telephone pole sticking out of their motorcycle’s seat or a big piece of garbage in the road. Unfortunately, like when you first started riding, the newer you are at this kind of photography, the more of your concentration is eaten up with just managing camera settings. As you get more comfortable shooting bikes, your vision will widen to see so many more things. 120 mm, 1/160 @ f/ 9.0. Although the rider is only going about 25 mph, the low shutter speed and the angle of the sunlight in the background helps add to the feeling of movement. 7. Crop for composition I always give myself a little breathing room in my framing when I shoot. Even though I often do it in camera, sometimes I want to give a shot a little more (or less) Dutch angle to make the shot more dynamic. Also, sometimes I see the shot quite differently in post processing than I do in the moment of capturing the image. Other times, a dramatic crop can take a surprising capture and make it something dramatic. The amount of cropping you can do is dependent on the resolution of your camera, so you’ll need to learn the amount of breathing room you can give before you compromise image quality. 24 mm, 1/200 @ f/7.1. Click here to see how heavily cropped the image is. (It works because of how blurry the action is already.) Note: This is a very dangerous shot to take. Not only am I standing in the middle of the road, but I’m also directly in the impact zone should something go wrong. 8. Post processing is your friend When you first start shooting motorcycle action, you’re going to generate hundreds, if not thousands, of image files. You’re going to need a way to view and cull your files, or you’ll get overwhelmed by them. Although there are other, less expensive (or free) asset management and image editor applications out there, Adobe has, in my opinion, the strongest pairing with Lightroom and Photoshop for your average recreational shooter. You can have access to both of them for about $120 per year. Although Adobe is really pushing the cloud-based version of Lightroom, I recommend Lightroom Classic to keep all your files on your desktop/laptop. 35 mm, 1/250 @ f/8.0. An example of the room I leave for cropping in post. This shot was framed specifically to include the rock formation in the background. With Lightroom or another asset management system, you can quickly look through your photos from a day’s shoot, mark the ones you want to keep, and move on to color correcting, cropping, spot removal, and other massaging of the pixels. Remember, they are called RAW files for a reason. The files are just a starting point for what the finished photo will look like. As with motorcycling, there is always something new to learn in image processing. Over time, you’ll find that your definition of what a properly post-processed photo looks like will change. That means you’re getting more accomplished. Oh, and always backup all your photos after a shoot. Once you become proficient in Lightroom, you may want to try your hand at a deeper level of retouching in Photoshop. Go for it! 9. Be careful. It’s addicting! While I have been interested in photography all my life, digital photography opened the world to me because making mistakes (and learning from them) doesn’t cost anything, unlike film processing in the past. Much of becoming a competent shooter is simply clicking the shutter many, many times and learning from the results. Photography has brought me closer to motorcycling, and my friends have benefited by receiving photos of themselves looking like wing-footed deities (as Burns would say). Happy shooting! 150 mm, 1/800 @ f/5.6. The post Motorcycle Photography: 9 Ways To Get The Perfect Shot appeared first on Motorcycle.com. http://feeds.feedburner.com/~r/Motorcyclefeed/~4/q9FjIifbb_4Source Link to comment Share on other sites More sharing options...
XTreme Posted May 6, 2021 Share Posted May 6, 2021 Nothing for you here @Buckster or @Six30 2 Link to comment Share on other sites More sharing options...
Buckster Posted May 6, 2021 Share Posted May 6, 2021 Link to comment Share on other sites More sharing options...
Buckster Posted May 6, 2021 Share Posted May 6, 2021 Of course I am the only one here that has posted any decent action shots, admittedly taken by professionals. Does anyone have any idea how much it costs to get a hooker to take pictures of you on your motorcycle? It's not cheap. Get a professional they said, how the hell was I supposed to know they meant photographer? 3 Link to comment Share on other sites More sharing options...
XTreme Posted May 6, 2021 Share Posted May 6, 2021 1 hour ago, Buckster said: Of course I am the only one here that has posted any decent action shots But none in the 8 years since Ian! 1 Link to comment Share on other sites More sharing options...
Slowlycatchymonkey Posted May 6, 2021 Share Posted May 6, 2021 Let’s see ‘em then. Just for clarity of the twisted minds here I mean pics of the bike not the prostitute. 1 Link to comment Share on other sites More sharing options...
Buckster Posted May 7, 2021 Share Posted May 7, 2021 19 hours ago, XTreme said: But none in the 8 years since Ian! I don't want to over do things. 1 1 Link to comment Share on other sites More sharing options...
Tym Posted May 7, 2021 Share Posted May 7, 2021 I never saw them and my font is Georgia! 1 Link to comment Share on other sites More sharing options...
XTreme Posted May 7, 2021 Share Posted May 7, 2021 13 minutes ago, Tym said: I never saw them and my font is Georgia! What exactly has caused this large font Renaissance Tym? Link to comment Share on other sites More sharing options...
Tym Posted May 7, 2021 Share Posted May 7, 2021 I can see anything smaller, my eyes are going bad. Link to comment Share on other sites More sharing options...
XTreme Posted May 7, 2021 Share Posted May 7, 2021 11 minutes ago, Tym said: I can see anything smaller, my eyes are going bad. You got glasses though? Link to comment Share on other sites More sharing options...
Tym Posted May 7, 2021 Share Posted May 7, 2021 2 hours ago, XTreme said: You got glasses though? I meant i cant, i dint see the typo, glasses? Got them from Wallmart, is there a problem with my glasses? 1 Link to comment Share on other sites More sharing options...
Sofia Posted May 11, 2021 Share Posted May 11, 2021 On 06/05/2021 at 14:00, BellEnd said: Human beings are predisposed to collect pictures of their exploits. From back in the time of cave dwellers with their wall art to oil painting to the camera obscura to film to today with our digital cameras, we have an innate desire to create physical manifestations of our memories, and while we now carry important photos in phones instead of our wallets, this need to capture moments and try to relive them later seems to be undergoing a heretofore unseen level of growth. Unfortunately, most of these images are quick grabs without much – or any – thought put into the process and how to make the image as visually pleasing as possible. They are just frozen slices of time. But they can be so much more. 155 mm, 1/800@ f/6.3. If you’re one of those people who has spent almost as much time looking at the photos as you have reading the text of motorcycle publications, then maybe you’d like to try your hand at photographing motorcycles, too. You really can start doing it with almost any DSLR you may happen to have. Who knows, you may find a new hobby to go alongside your love of riding motorcycles. After all these years, I have no regrets for transporting cameras for many thousands of miles on my back, in tank bags, or panniers. It was well worth the effort. Finally, before we move on to the photography tips, I would be remiss if I didn’t point out that the act of shooting motorcycles often requires multiple passes back and forth in front of the camera. Remind your riders to do it safely, even if it means riding down the road a quarter mile or more to a pull out. Believe it or not, the most dangerous thing we do as motojournalists is make U-turns on winding two lane roads. Visibility is limited, and often the road is quite narrow, which makes turning around a challenge on big bikes. Be safe out there. (Another option is to hang out in a corner on a popular road and shoot everyone who comes by.) 1. It’s about the technique, not the camera Don’t get me wrong, there’s a reason why professional photographers spend a small fortune on camera gear, and you can run up a bill of more than $10,000 in the blink of an eye. Still, for the motorcycle and camera enthusiast, you don’t have to have the latest and greatest gear or the biggest sensor to capture stunning motorcycle photos. For example, during six of my seven years at MO, I was using an 8.2 megapixel camera. (My iPhone had 50% more megapixels for years.) Many of the photos used in this article were shot with a camera that was 13 years old when I retired it last Fall. My beloved Canon 1D Mark II N, battered and bruised and ready for retirement after 13 years of hard use. The battery even had to be held in with gaffer’s tape for the last six months while I waited for Canon to release the camera I’d chosen to replace it. So, what do you need for motorcycle action photography? If you’re just taking shots of your bike sitting still in beautiful locations, any digital camera will do. Capturing action is what challenges your camera’s capabilities. First, quick autofocus is essential. Being able to move the focus point around the frame will be a plus because it allows you to be creative with your framing. Although I started shooting motorcycles with a camera that could only shoot six frames per second, eight to ten FPS is a pretty common starting point in cameras today. Sensor size is another feature to consider. Both full frame and cropped sensor cameras have their strengths and weaknesses, but for someone starting out in motorsports photography, a 1.6 crop sensor will give you a longer reach with your lenses. They also have the benefit of typically being less expensive than full frame cameras. 420 mm, 1/800 @ f/6.3. Lest you think that you need an expensive camera to shoot motorsports, this photo of Eric Bostrom was shot in 2006 with a Canon 20D and a rented 300 mm lens plus a 1.4x adapter. And now to megapixels. Yes, having more megapixels allows you to crop into your images further. However, as I learned when I jumped from 8.2 mp to the 45 mp of the Canon R5, having more resolution also meant that there was more detail pointing out the flaws in my technique. Then again, when the photos are sharp, they are amazing. Personally, I think anything from 12-20 mp is fine for most uses. In fact, I know of many pro action photographers who are using 20 mp with results that I aspire to. Finally, the question of DSLR or mirrorless. With a DSLR, you are actually looking through the lens, thanks to a mirror that flips out of the way when the photo is captured. Mirrorless cameras have the sensor exposed to light when turned on, and the photographer has an electronic viewfinder for framing while shooting. Viewfinder lag is the biggest issue facing mirrorless cameras, and naturally, the more expensive ones have the least lag. While mirrorless is certainly the future of digital photography, camera manufacturers are making the best DSLRs ever, right now. So, there is nothing wrong with using a DSLR. 70 mm, 1/500 @ f/5.6. This type of photo could be captured with any point-and-shoot camera – even a smartphone (although the image quality might be compromised). That’s the basics, but we could go way off into the weeds discussing mechanical versus electronic shutter (and it’s rolling shutter effect) or the best cameras for shooting in low light or RAW versus jpeg. If you get into motorcycle photography, you’ll eventually go there. Trust me. 2. Use a long lens, mostly In my motorcycle photography kit, I have three zoom lenses: 24-70mm, 70-200mm, and 100-500mm. However, the vast majority of my photos are taken with the 70-200mm, which is just about perfect for standing on the side of the road to capture passing bikes. Being able to step back away from your subject makes it easier to pan with it because you don’t have to rotate your body as far or as fast as the bike passes in front of you. For head-on shots, a longer lens allows you to compress the background, giving it a more graphic look. Also, longer lenses have a shallower depth of field to blur the areas of the frame that are not specifically in focus – something I do quite a bit in beauty shots. Don’t get me wrong, there are plenty of uses for wider focal lengths. While I typically use a wide lens for more scenic, landscape shots featuring a motorcycle parked in a spectacular location, a wide lens can also be used for action. It’s just significantly harder to capture. When the bike is featured large in the frame, you have to be very close to it, and when it is small in the frame, the slightest miscue with your pan can diminish the bike’s sharpness considerably. Also, it’s fun to be able to distort how things appear in a wide lens by putting the subject extremely close to the lens and letting it’s tendency to accentuate distances play out. 150 mm, 1/1000 @ f/5.0. There is just enough blur to the front tire to give the sense of motion. The way the double yellow frames the rider adds to the sense of speed. Using a super-telephoto lens also brings its own set of challenges, the biggest of which is that, at the long end of the zoom range, tracking the subject can be a challenge. That’s why if you watch professional photographers at the race track, you’ll see them supporting their big glass on a monopod. For my purposes, I tend to use the 200-300mm the most with my longest lens, saving the really long millimeters for special circumstances. I lean heavily on technological aids, like monopods and image stabilization, when shooting with longer lenses. The ability to minimize errant movement of the lens can’t be downplayed, particularly in pan shots. 70 mm, 1/800 @ f/4.5. This is as wide as my favorite lens gets, but it’s still long enough to have the bike large in the frame, keep me a safe distance from the bike, and still give some locational context. 3. Freeze the action Although we call it still photography, that is really a misnomer. As photographers, we are really dealing with differing slices of time in our exposures. The higher the shutter speed, the smaller the slice of time represented within the image and, hence, the greater the appearance of stillness. The manipulation of the appearance is where photographic skill comes into play. With enough light, you could shoot everything at 1/2000 of a second and get consistently sharp images of motorcycles. Unfortunately, they’d be pretty boring. Everything would look like it is standing still, and the biggest attraction of motorcycling, it’s dynamism, would be left out. So, the trick – and the fun – of shooting bikes is the management of the stillness and movement within the frame. 30 mm, 1/800 @ f/3/2. Freezing the image at peak action is the goal for this photo. Still, there’s just enough blur in the tires to give a feeling of movement. When shooting head-on or front three-quarter shots (or rear shots, too), you want the bike to be as crisp as possible. However, use too high a shutter speed, and you’ll completely freeze the tire tread or brake discs, destroying the sense of motion. Use too slow a shutter speed, and the photo may appear just the slightest bit soft. This is where the creative dance with the subject matter takes place. For street action, I typically shoot these shots from 1/800 sec to 1/1200 sec, depending on the closing speed. 4. Blur the action Pan shots are a different challenge. Here, you’re trying to keep the motorcycle sharp but have the background and the moving parts of the bike blurred. To do this, you lower the shutter speed. However, since you’re shooting a larger slice of time in which the subject is (presumably) moving across the frame, you have to pan the camera to keep the bike in the exact same place in the frame, a simple idea, but it is maddeningly complex in practice. Pan shots are where the photographers who have surgeon-like steadiness in their hands can excel and mere mortals (and people like me who have very shaky hands) can only dream. Still, if I can shoot pan shots, even with my essential tremor, you can, too. It just takes practice. 363 mm, 1/400 @ f/7.1. Although she is riding here, I inadvertently used too fast a shutter speed, making the bike look like it is standing completely still. On the street (track shooting usually requires higher shutter speeds), start at around 1/320 sec, acquire focus early, pan with the subject, and actuate the shutter just before the rider reaches the point where you want to take the shots. In the beginning, you’re going to shoot way more shots than you need, and most will have a focus or motion-blur issue. Initially, your hit/miss ratio will be disheartening. Don’t worry, you’ll get there. Gradually, you’ll want to start lowering your shutter speed to bring progressively more blur into your shots. Note: Your rider doesn’t need to be traveling particularly fast to make it look like they’re flying. You do it with a slow shutter speed, which photographers call dragging the shutter. 168 mm, 1/160 @ f/11. Although the low shutter speed adds to the sense of motion, making the wheels’ spokes disappear, having a wall close behind the rider makes the motion even more apparent. Here’s a trick to make action shots easier: enable back button focusing, which means you separate the focus function from the shutter release. You’ll find this in the custom settings on your camera, and it allows you to use your thumb on one of the buttons on the rear of the camera to begin autofocus, freeing your index finger to only actuate the shutter. This will initially mess with your head, but it’s much easier to use two fingers rather than trying to hold the shutter release down halfway while you pan. 5. Highlight your subject You want to find ways to make your subject stand out from the background. Think about it. That’s what you’re doing with the blur in pan shots. While whole books have been written on this topic, some basic tricks can be used to bring the viewer’s eye to your subject. The first is the depth of field, or how much of your photo is in focus. With a wide aperture (how far the iris in your lens is open), the area in the frame that is in focus gets smaller. The focal length of the lens also plays a role, which is why I frequently use 200 mm and f/2.8 as my settings for beauty shots of a motorcycle’s profile, making it tack sharp and everything else soft. (Remember, the smaller the number of the f-stop, the larger the aperture opening in the lens.) 300 mm, 1/800 @ f/5.0. Even with the rider wearing black, the front-lit subject stands out from the darker background. Focus isn’t the only way to make the photo’s subject stand out. Having the brightly lit bike and rider in front of a dark background or silhouetting them against the sky are just two ways to use light to your advantage. One of my favorite ways to draw attention to the motorcycle is to use graphic elements within the frame. A curving double-yellow line or the shape of objects on the background can frame the motorcycle within the image’s borders, making the subject stand out. 90 mm, 1/100 @ f/4.0. This shot was staged specifically because of how the shape of the tree matched the Victory Magnum X-1. 6. Consider the background This point is really just an extension of the previous one. Nobody wants to see a telephone pole sticking out of their motorcycle’s seat or a big piece of garbage in the road. Unfortunately, like when you first started riding, the newer you are at this kind of photography, the more of your concentration is eaten up with just managing camera settings. As you get more comfortable shooting bikes, your vision will widen to see so many more things. 120 mm, 1/160 @ f/ 9.0. Although the rider is only going about 25 mph, the low shutter speed and the angle of the sunlight in the background helps add to the feeling of movement. 7. Crop for composition I always give myself a little breathing room in my framing when I shoot. Even though I often do it in camera, sometimes I want to give a shot a little more (or less) Dutch angle to make the shot more dynamic. Also, sometimes I see the shot quite differently in post processing than I do in the moment of capturing the image. Other times, a dramatic crop can take a surprising capture and make it something dramatic. The amount of cropping you can do is dependent on the resolution of your camera, so you’ll need to learn the amount of breathing room you can give before you compromise image quality. 24 mm, 1/200 @ f/7.1. Click here to see how heavily cropped the image is. (It works because of how blurry the action is already.) Note: This is a very dangerous shot to take. Not only am I standing in the middle of the road, but I’m also directly in the impact zone should something go wrong. 8. Post processing is your friend When you first start shooting motorcycle action, you’re going to generate hundreds, if not thousands, of image files. You’re going to need a way to view and cull your files, or you’ll get overwhelmed by them. Although there are other, less expensive (or free) asset management and image editor applications out there, Adobe has, in my opinion, the strongest pairing with Lightroom and Photoshop for your average recreational shooter. You can have access to both of them for about $120 per year. Although Adobe is really pushing the cloud-based version of Lightroom, I recommend Lightroom Classic to keep all your files on your desktop/laptop. 35 mm, 1/250 @ f/8.0. An example of the room I leave for cropping in post. This shot was framed specifically to include the rock formation in the background. With Lightroom or another asset management system, you can quickly look through your photos from a day’s shoot, mark the ones you want to keep, and move on to color correcting, cropping, spot removal, and other massaging of the pixels. Remember, they are called RAW files for a reason. The files are just a starting point for what the finished photo will look like. As with motorcycling, there is always something new to learn in image processing. Over time, you’ll find that your definition of what a properly post-processed photo looks like will change. That means you’re getting more accomplished. Oh, and always backup all your photos after a shoot. Once you become proficient in Lightroom, you may want to try your hand at a deeper level of retouching in Photoshop. Go for it! 9. Be careful. It’s addicting! While I have been interested in photography all my life, digital photography opened the world to me because making mistakes (and learning from them) doesn’t cost anything, unlike film processing in the past. Much of becoming a competent shooter is simply clicking the shutter many, many times and learning from the results. Photography has brought me closer to motorcycling, and my friends have benefited by receiving photos of themselves looking like wing-footed deities (as Burns would say). Happy shooting! 150 mm, 1/800 @ f/5.6. The post Motorcycle Photography: 9 Ways To Get The Perfect Shot appeared first on Motorcycle.com. http://feeds.feedburner.com/~r/Motorcyclefeed/~4/q9FjIifbb_4 Source Thank you, very good read. Its great to hear from the experts and try to apply something. Link to comment Share on other sites More sharing options...

Recommended Posts
Create an account or sign in to comment
You need to be a member in order to leave a comment
Create an account
Sign up for a new account in our community. It's easy!
Register a new accountSign in
Already have an account? Sign in here.
Sign In Now